I am using windows 10 and whenever I am trying to install printer driver, it is showing error: Printer Driver Package Cannot be Installed. What should I do to fix the issue Printer Driver Package Cannot be Installed?
The error Printer Driver Package Cannot be Installed is basically an issue with the installation process of the printer. First of all, we would like to cover on how you can add a printer to your computer. Press Windows + S to launch the search bar and type “Printer” in the search bar.
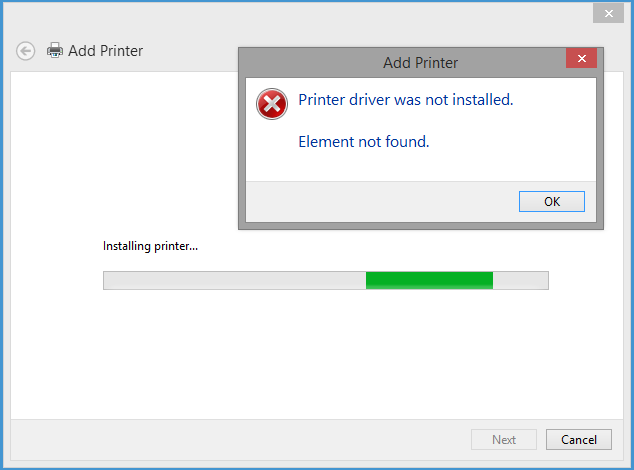
Once you have opened the Printer settings, click on “Add a printer or scanner”. Now windows will automatically start searching for connected printers either through a cable or in the network. Make sure that your printer is connected properly before going through the detection.
Solution 1: Running the Printer Troubleshooter to fix “Printer Driver Package Cannot be Installed”
Windows has an inbuilt collection of troubleshooters for troubleshooting problems. We can run the printer troubleshooter and check if it detects any problems and fixes them.
- Press Windows + R, type “control panel” in the dialogue box and press Enter.
- Type “troubleshoot” in the search bar of the control panel at the top right of the window.
- Select “Troubleshooting”.
- Once in the troubleshooting menu, click “View all” at the left side of the window. Now Windows will show all the troubleshooters available on your computer.
- Navigate through the options until you find “Printer”. Click it.
- Check both the options “Run as administrator” and “Apply repairs automatically”. These options will ensure that you find maximum problems and the repairs are applied fast as well.
- Follow the on-screen instructions and wait for the troubleshooting to complete.
Method 2: To empty the Temp folder, use the Disk Cleanup utility in Windows.
- Open Start > All Programs > Accessories > System Tools > Disk Cleanup.
- This opens the Disk Cleanup utility, which starts with Windows calculating how much space it can make available on the local hard drive (normally C:).
- Make sure that Temporary Files is ticked in the ‘Files to delete‘ dialogue before you click OK to start the cleanup.
- At the end close the utility.
Solution 3: Stop the Spooler Service and Delete Printer Files
You can stop the Spooler Service from the services window, delete temporary internet files and restart the service. It is possible that the drivers couldn’t function properly due to discrepancy, and restarting the service will fix it.
- Press Windows + R to launch the Run application. Type “services.msc” in the dialogue box and press Enter.
- Locate the service “Print Spooler” present in the list of services. Double-click it to open its properties. Click the “Stop” button present underneath system status and press “OK” to save changes.
- As service is disabled, now delete printer files. Press Windows + E to launch the quick access and click on “This PC” present in the left navigation pane.
- Navigate to the following path:
C:\Windows\System32\spool\PRINTERS
Permission might be needed to access the following folder. If prompted, press Continue.
- Once in the folder, delete all the files in the Printer folder and close the window.
- Now navigate back to the Services tab and Start the “Printer Spooler” service. Keep the startup type as “Automatic”.
- Now try to install the drivers for your printer again.
Solution 4: Updating your Printer Drivers Manually and Automatically
We can try updating the Printer driver manually and check if this solves the problem. In order to update it manually, you need to have the driver from the manufacturer’s website. Since there are hundreds of printers out there, it is not feasible for us to list each one of them.
- Press Windows + R to launch the Run Type “devmgmt.msc” in the dialogue box and hit Enter. This will launch your computer’s device manager.
- Navigate to all the hardware and right click on your printer hardware and select “Update driver”.
- Now Windows will pop a dialogue box asking you which way do you want to update your driver. Select the second option (Browse my computer for driver software) and proceed. If you are unable to manually update the drivers, you can also give automatic updating a shot. Select the driver file you downloaded using the browse button when it appears and update it accordingly.
- Restart your computer.
Automatic update of Drivers:
You can use Windows Update for it to automatically search for different drivers available online and update it automatically. Windows roll out important updates targeting the bug fixes in the operating system. If you are holding back and not installing the Windows update, we strongly recommend that you do. There are a lot of issues still pending with the OS and Microsoft rolls out frequent updates to target these issues.
- Press Windows + S button to launch your start menu’s search bar. In the dialogue box type “Windows update”. Click the first search result which comes forward.
- Once in the update settings, click on the button which says “Check for updates”. Now Windows will automatically check for updates available and install them. It may even prompt you for a restart.
- After updating, check if your issue got fixed.
Solution 5: Uninstalling the Printer to fix the error Printer Driver Package Cannot be Installed
If the above methods don’t work, we can try uninstalling the printer and then update it accordingly. Uninstalling the printer removes all data related to the printer from your computer so you can install it from scratch.
- Press Windows + R to launch the Run Type “devmgmt.msc” in the dialogue box and hit Enter. This will launch your computer’s device manager.
- Navigate to all the hardware and right click on your printer hardware and select “Uninstall Device”.
- After uninstalling the device, follow the driver update steps given in solution 3 and add your printer using the method at the top of the article.
Note: If your computer doesn’t detect the printer on your network, try resetting your router and reconnecting both, your computer and your printer. You should always as a precaution, restart your router every once in a while to avoid problems like these.
Solution 6: Changing Printer Connection Port to fix Printer Driver Package Cannot be Installed error
You can also try to change printer’s port from LPT1 to USB001. Also if you are trying to access and install the printer using a network, you should connect it manually to your computer and then try installing using the steps mentioned. For first-timers, it is often necessary that the printer gets a wired connection to your computer in order to configure the settings. Once the printer is detected and installed successfully, go to devices, right-click on the printer and mark it as default.